The Mechanics of Flushing
The standard toilet relies on gravity and water pressure from the tank to flush away the water in the bowl. Unfortunately, this pressure can weaken with natural wear and tear. If your toilet lacks sufficient water pressure when flushing, you’ve come to the right place! Mr. Rooter Plumbing of Southeast Georgia is excited to share some premier tricks of the trade you can follow to increase your toilet’s flushing power.
Diagnosing a toilet’s water pressure issues and taking the necessary steps to improve it may seem daunting. In most cases, however, it is a simple task you can accomplish without spending much money or effort. We strongly believe you will be able to handle this issue – even if you consider yourself an amateur with little to no plumbing experience. That said, never hesitate to contact our courteous team if you need any plumbing assistance. We’re always eager and ready to come to the rescue!
Check for Clogs
A clog is the most likely culprit of poor flushing performance. You probably have a clogging issue if you notice your toilet taking forever to flush, empty, and refill again. A toilet drain will quickly fail to siphon wastewater if the piping becomes obstructed. We suggest pouring a gallon of hot water into the toilet bowl to check if your toilet is backed-up. If the hand-poured water doesn’t flush, you are almost certainly dealing with a clog.
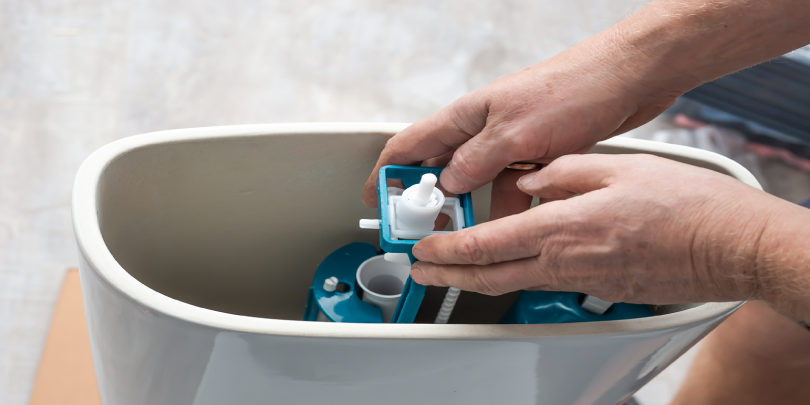
Increase the Tank’s Water Level
The toilet tank’s water level greatly determines the power of every flush. A half-full tank will lack the water pressure your toilet needs to flush adequately.
To check the water level, you must:
- Remove the tank lid.
- Find the mark indicating the optimal water level (it should be beneath the overflow tube).
The good news is that you can adjust your water level (if it is too low.) The float assembly inside the tank will consist of a ball or cup float with levers that bob just above the water line (turning the fill valve on or off).
The process of adjusting the water level will depend on what type of float is present:
- Adjusting a cup float: Empty the tank by turning the shut-off valve, pinch the clip that connects the cup to the fill valve shaft, and slide the float upwards. The critical level mark must always remain at least an inch above the overflow valve. If performed correctly, this process should raise the water level.
- Adjusting a ball float: The process does not require turning off the water valve or draining the tank. You can elevate the ball float by turning the screw above the fill valve. Raising the float should raise the water level and hopefully solve your water pressure problem.
Always flush the toilet to monitor water pressure after making adjustments. Doing so will allow you to find the ideal water pressure.
Check & Clean Mineral Buildup
Standing water contains calcium, mineral deposits, and grime that can build up along the walls of your toilet’s tank. Over time, this buildup can impair essential parts inside the tank. Regularly cleaning, scrubbing, and maintaining your toilet tank should keep it operating smoothly. Many sources recommend using a gallon of bleach to soak and dissolve the minerals and grime. We advise against this strategy. Bleach can be corrosive and deteriorate the seals in your toilet. Instead, we recommend trying vinegar and hot water. Routine cleanings should significantly improve a toilet’s water pressure.
Remove Debris & Grime from Flush Holes
We also recommend cleaning your toilet bowl’s flush holes and siphon jets (located just below the inner rim). The holes release water from the tank to help flush wastewater down the drain. Like your tank, mineral deposits can clog siphon jets.
To clean the flush holes, we recommend you:
- Empty the tank by flushing the toilet after turning off the water supply.
- Apply waterproof duct tape over the flush holes.
- Pour white vinegar into the toilet tank.
When you flush the toilet, the tape should trap the white vinegar and dissolve mineral buildup. Let the vinegar sit for 30 minutes at a minimum.
Feel free to remove the tape and turn the water supply back on after soaking the siphon jets in vinegar. It will take a few flushes to clear out the vinegar. You can also use a bristled bottlebrush to scrub away lingering mineral deposits. Repeating this process every year is a wise proactive way to eliminate mineral buildup before it causes a problem.
Consider a Replacement or Professional Repair
Finally, it might be necessary to hire a professional to repair or replace your toilet – especially if it is old or decrepit. A newer toilet may save you money and time in the long run by wasting less water and functioning smoothly. Our team can help you determine the most cost-effective solution. We offer years of industry-best experience, knowledge, and training. You can rest assured we have the answers to get your toilet reliably flushing at full power again!
Did our DIY tips fail to fix your toilet’s flush power? There may be a bigger issue. Call or contact us online for a complimentary consultation!

