A leaky bathtub can build mold, lead to rotting drywall or produce water-spotted ceilings and floors. Finding the source of the leak is the first step to repairing a bathtub that leaks water.
Finding and Repairing the Leak
Try using a flashlight to search around the bathroom to find bathtub leaks and repair the damage. Some different kinds of technology can also be helpful, such as a moisture meter or a water monitor.
A moisture meter helps you locate the exact water source in the floor, drywall, or studs and measures the extent of the moisture that has built up inside. Some meters may also inform you how old the water is and whether the leak is old or new by measuring the moisture over a few days.
Another great piece of technology is a water monitor that you can attach to your water lines. This mechanism alerts you immediately if there are any new leaks in the bathroom, and some come with an app you can download on your phone. Many apps will tell you the exact water source and determine how much water you use over time.
To repair bathtub leaks, finding the exact source of the leak is essential before you fix it. Here is how you can test the bathtub for a leak:
- Dry the outside of the tub with a rag or towel before beginning the test.
- Line the edges of the tub and the areas that meet the floor with newspaper.
- Fill up the tub with water to start the test and find where the tub may be leaking.
- If any parts of the newspaper become damp, you can tell which areas of the tub are leaking.
Bathtub leak repairs may also depend on testing other areas of the bathroom. One of the most likely areas of leakage is the drain. Here is how you can test the bathtub drain for leaks:
- Fill up the tub with water to begin testing where the drain leaks.
- Start listening for the water's sound to find the leak's source.
- Once you hear those sounds, watch for where the water drops to see if the drain is not fully sealed.
Bathtub Faucet Leak Repair
If the bathtub faucet leaks, start the repair process by turning off the water supply. After the water turns off, you can remove the plastic caps found on the faucet and use a screwdriver to take off the handle. A wrench may come in handy when it is time to remove the packing nut and replace the stem washers.
Once you remove the old faucet, secure the new one and its different parts and turn the water back on. The issue has been resolved if the new faucet does not leak. However, if your bathroom still experiences water leakage, another part of the bathtub may be at fault.
Fixing 1-Hole Faucets
Many bathtubs come with 1-hole faucets, meaning that the hot and cold water lines are connected to the same faucet. The leak may be coming from a specific line or a combination of both and you can test this by feeling the temperature of the water drip.
To find the exact area of the leak, turn on the hot and cold water separately and test each one for a few seconds. Check for leaks after each test and feel the faucet to see which water line has caused the leak.
Bathtub Grout Leak Repair
The grout around the bathtub and tiles may have worn or shrunk and caused leaks. Often this can be solved by regrouting the tiles and mixing the new grout with a silicone caulk that acts as a barrier against moisture.
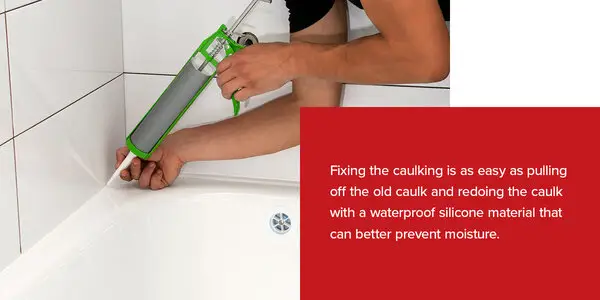
On the other hand, the caulking used to seal the bathtub may have cracked when water poured against the tiles due to splashing. This can cause rotting walls or a build-up of mold. Fixing the caulking is as easy as pulling off the old caulk and redoing the caulk with a waterproof silicone material that can better prevent moisture.
Whether you plan to replace the grout or the caulk, there are a few steps you should take to repair the leak properly:
- Dry the surface: Dry the surface of the tile or seams with a rag or towel to ensure that you can cut away the old material.
- Cut away the old material: Using a sharp tool, cut out the old grout or caulk by slicing the material horizontally along the top and bottom areas.
- Remove remaining material: To remove any extra material, use a scraper and clean away the tile or bathtub seams.
- Spray cleaner: Spray a good cleanser on the seams or the tile, depending on your repair job and scrub the area with a nylon brush.
- Wipe the seams with Clorox: Once the cleaner has had time to set, wipe the area with a Clorox wipe.
- Put the new material on the surface: Add new grouting or caulking to the area and around the cracks. Run your finger along the cracks to smooth the surface and allow the material to dry.
Cracked Bathtub Leak Repair
Although unlikely in steel-enamel or stone resin bathtubs, cracks may occur in acrylic or fiberglass bathtubs. Follow these steps to find and repair a cracked bathtub:
- Put a dry material against the bathtub: Place a dry towel or sheet against the sides of the bathtub and the floor.
- Fill the tub: Fill up the tub with water to find what areas of the bathtub may have cracks.
- Find the leak: By finding what areas of the towel or sheet become wet, you can locate the source of the leak.
- Mark the area: Mark the wet areas with a piece of tape to locate the cracks later.
- Fill the cracks: Fill up the cracks with waterproof putty or a firm caulk.
- Apply sealant: After drying the surface, apply a waterproof sealant to the fixed cracks and run your finger along them to smooth the surface.
- Retest the water: After the sealant dries, refill the tub with water to test the cracks. Consider using a bathtub liner if you continue experiencing issues.
Bathtub Drain Leak Repair
If the drain seems to be the issue, you may be experiencing a sinking effect. This happens when the drain plug is broken, or there is a leak in the overflow drain, and the water sinks a few inches when using the bathtub. If you find water spots in the ceiling or floor, this may be a sign that the drain needs repair.
Follow these steps to test and repair a leaky drain:
- To test if the leak comes from the gasket, spray some water over the overflow drain.
- To test whether or not the leak is coming from the drain plug, remove the plug and feel around the surface for a hole.
- Fill holes or cracks with sealing putty.
- Reinstall the drain plug or gasket and try the mechanisms again to see if the problem is fixed.
Bathtub Pipe Leak Repair
The pipes may sometimes leak, leading to an unhealthy amount of mold, rotted drywall or water spots. It is best to fix leaks before they lead to extensive damage. Some homes or businesses have access panels that allow you to use a flashlight and find drips or watermarks from the pipes.
If the home or business does not have an access panel to the pipes, you can use other forms of technology to find the source of the leak or resort to other methods like tearing out the drywall or calling a professional. A few areas where the pipes may leak include the overflow pipe or the washer.
The overflow pipe is often the most common cause of pipe leaks, though the washer between the overflow pipe and the tub can also become cracked due to age. In both cases, a professional may best understand how to locate and safely repair the leak.
Get Professional Plumbing Services With Mr. Rooter in Syracuse, NY
Mr. Rooter Plumbing was founded in 1970 and continues to produce quality work at fair prices. Our independently owned and operated business helps customers all over the U.S. and Canada while investing in local communities. We genuinely care about every one of our customers, and whether you need us to look at your drain, repair a bathtub leak or fix a faucet, Mr. Rooter Plumbing is here to help. Contact us online to speak to a representative and find assistance with your bathtub leak repair.